“Enhance attendee engagement and streamline navigation with rsvpBOOK’s event app features.”
Introduction
In today’s fast-paced world, event attendees expect more than just schedules and static maps—they crave interactive tools that simplify their experience and keep them engaged. A well-designed mobile app can be a game-changer, offering features like real-time updates, personalized schedules, and interactive floorplans. With rsvpBOOK’s suite of tools, setting up a dynamic event app is straightforward, allowing you to create a seamless and memorable experience for your attendees.
This guide will focus on the essential steps to setting up your event’s mobile app. We’ll start with configuring the app itself, adding vendors and their profiles, and designing an interactive floorplan that ensures attendees can easily navigate your event. Finally, we’ll explore how to incorporate gamification, such as QR code scavenger hunts and vendor interactions, to keep attendees engaged and excited throughout the event. By following these steps, you’ll have a fully functional and impactful app ready to enhance your event experience.
Chapter 1: Setting Up Your Event’s Mobile App
Creating a mobile app for your event is the foundation for delivering a seamless, interactive attendee experience. rsvpBOOK makes it simple to configure your app, offering tools to customize its design, add essential features, and ensure everything works flawlessly before launch. Follow these steps to set up your app effectively.
Step 1: Accessing the Mobile App Tools
To begin setting up your app:
- Log in to your rsvpBOOK dashboard. If you don’t have an account, click here to create one for free.
- Navigate to the On-Site Tools → Registrant Mobile App section, located in the main menu on the left side of your dashboard.
- This section provides tools to configure your app’s branding, layout, and interactive features.
The dashboard provides a variety of customization tools, allowing you to adjust the app’s appearance and functionality to align with your event goals.
Step 2: Customizing the App’s Appearance
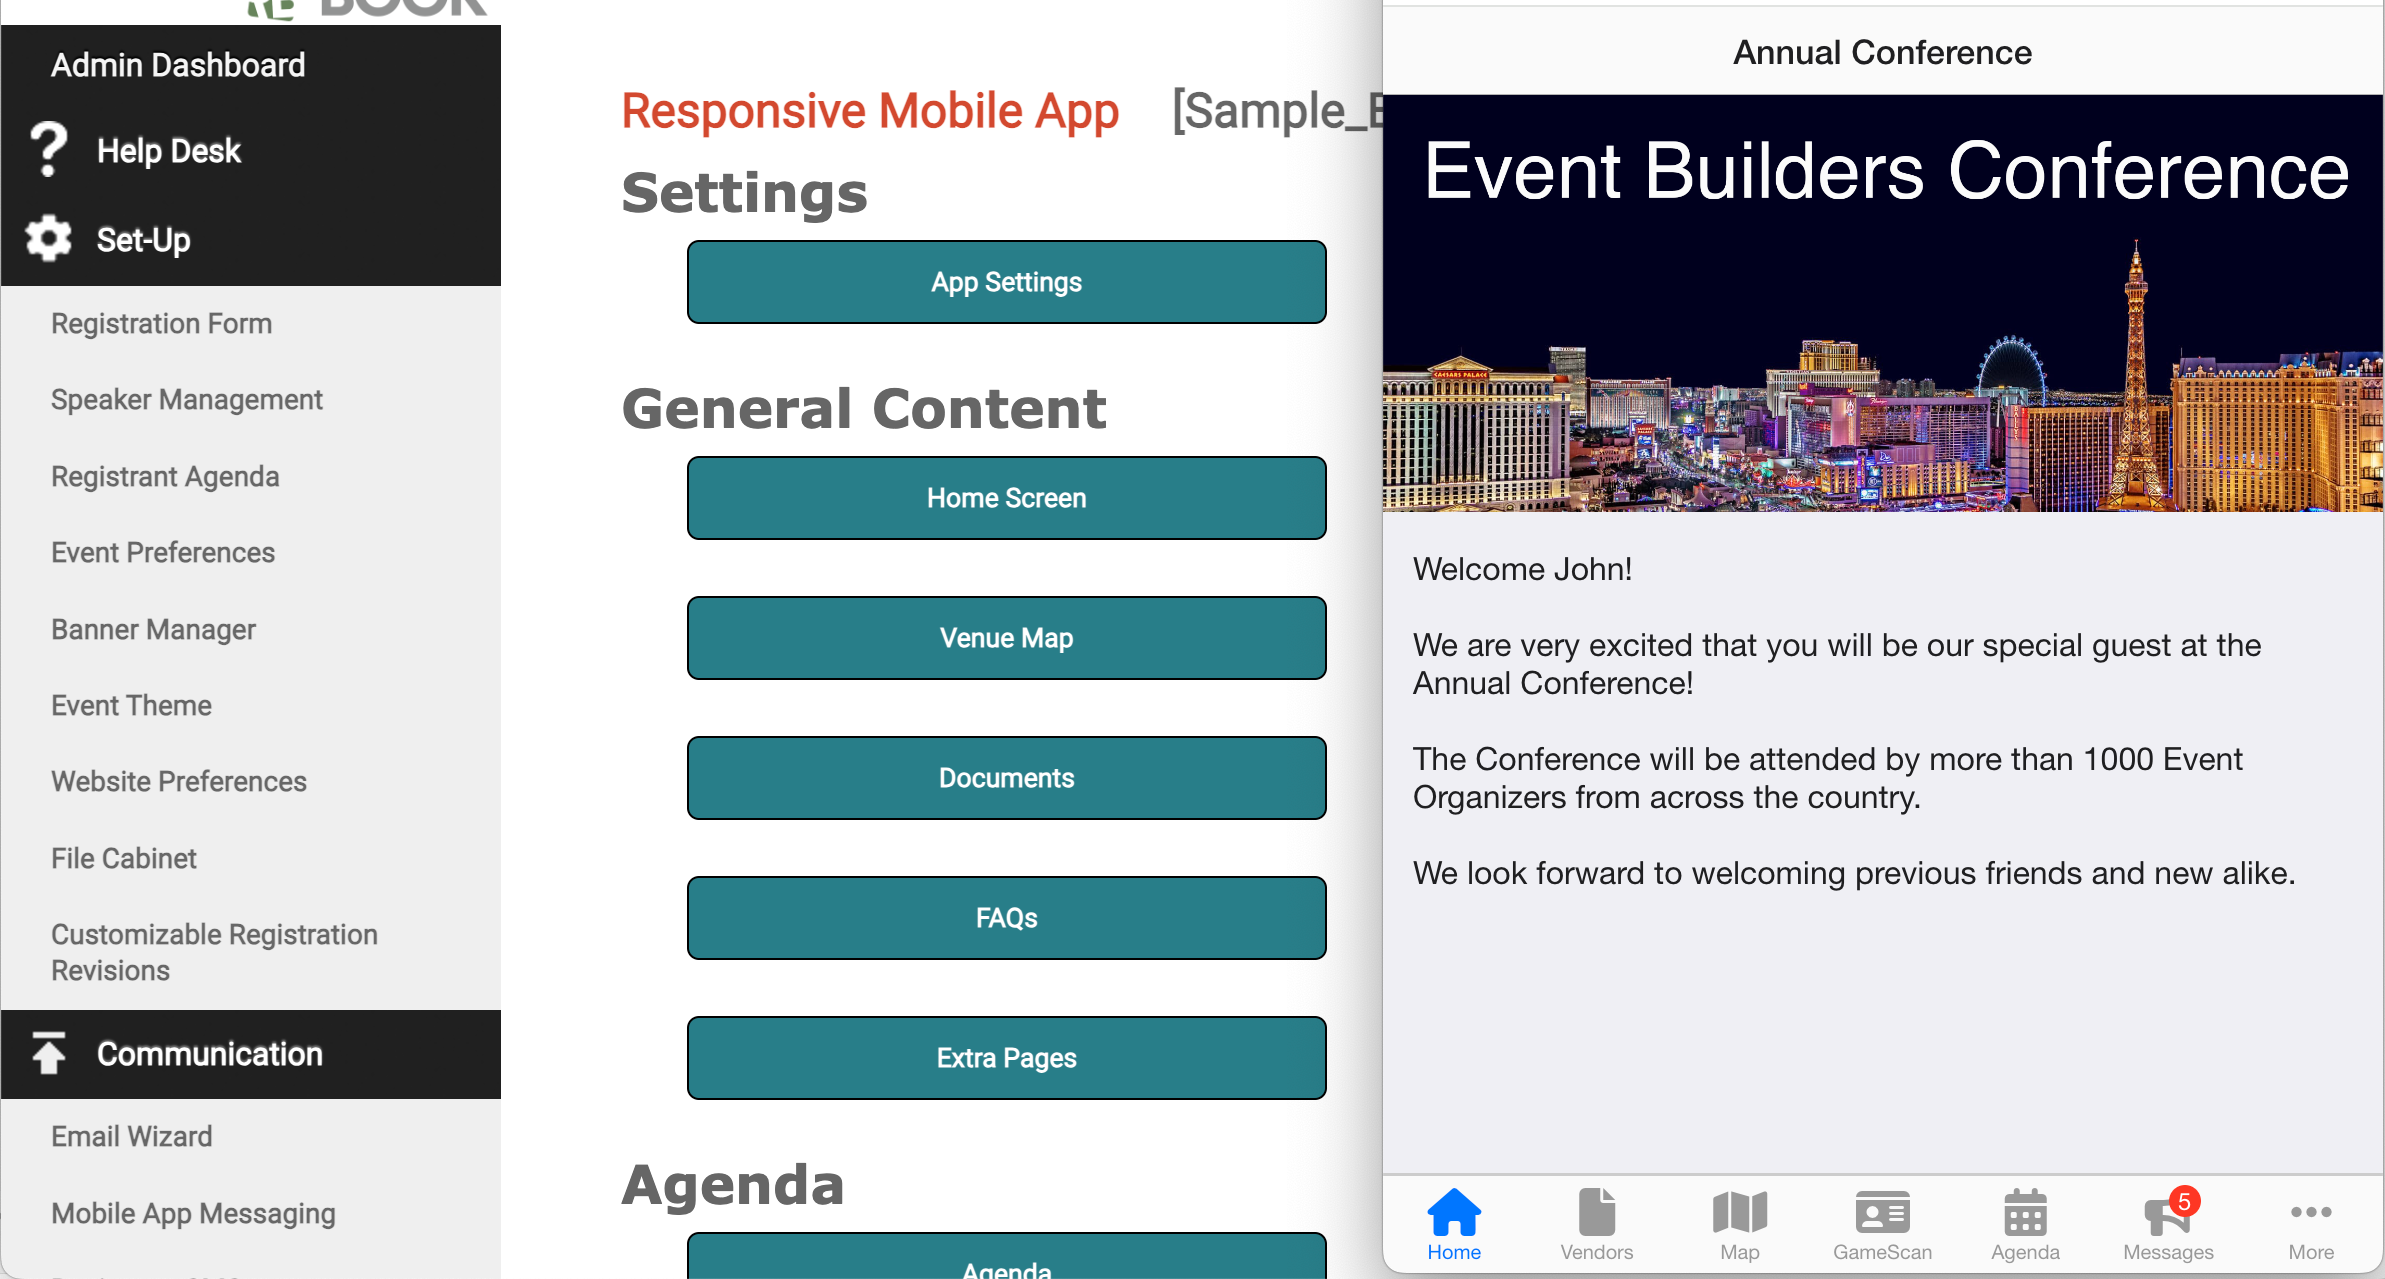
Make your app visually appealing and consistent with your event branding. You can access ‘App Settings’, ‘Customize Navigation’, ‘Home Screen’, and other tools under the Registrant Mobile App settings panel.
- Set Branding Elements: Upload your app logo (512×512 PNG) and customize its name as it will appear when installed on attendees’ phones. Access this under “App Settings” in the Registrant Mobile App section.
- Adjust Layout: Arrange the app’s navigation to highlight important features like schedules, vendor maps, gamification, or announcements. Reorder items or hide unnecessary sections in “Customize Navigation”.
- Personalized Homescreen: Add an event banner and a personalized greeting (e.g., “Welcome to [Event Name], [Attendee Name]!”). Configure these options in the “Home Screen” settings.
Customizing the appearance ensures the app feels polished and professional, creating a positive impression for attendees. Now, we will enhance and tailor the mobile app for your specific needs.
Step 3: Configuring Core Features
Activate the features that attendees will rely on during your event:
- Schedule Management: Enable personalized schedules in your app in “Agenda” settings. Once enabled, any session chosen by the attendee will automatically be shown. Include key items like meals, general sessions, and workshops to ensure attendees don’t miss important opportunities. To add things such as meals, general sessions, breaks and networking opportunities, go to “Setup → Registrant Agenda” under your main menu.
- Notifications: Use push notifications to remind attendees about upcoming sessions, changes to the schedule, or special announcements. To send push notifications, go to “Communication → Mobile App Messaging” under your main menu.
- Regional Maps: Give your attendees information about the local area by uploading multiple maps of the area. Manage these maps in the “Venue Map” settings.
- Supporting Materials: Upload event-related documents like session handouts, vendor catalogs, or event maps. Ensure files are in attendee-friendly PDF format for easy access. Manage these in “Documents” settings.
- Frequent Questions: Address common attendee questions, such as: “Where can I find the help desk?” and “What’s included in the VIP package?”. Manage these in “FAQs” settings.
- Additional Content: Use extra pages for additional content that doesn’t fit standard sections, such as:
- “About the Event” page with a welcome message and history.
- “Sponsors” page featuring sponsor logos, descriptions, and links.
- “Community Guidelines” page outlining event policies for behavior, safety, or accessibility.
Uploading session handouts and vendor catalogs ensures attendees have all the resources they need, increasing their satisfaction with the event. Manage this content in the “Extra Pages” section.
By setting up these core features, you provide attendees with the tools they need to navigate the event effectively.
Step 4: Testing the Mobile App
Before launching the app, test its functionality to ensure a smooth attendee experience:
- Check Navigation: Ensure all links, menus, and features work as intended.
- Device Compatibility: Test the app on various devices (smartphones, tablets) and operating systems.
- Simulate Scenarios: Walk through the attendee experience by creating a test profile and exploring the app.
To test your app, simply go to your Admin Dashboard. When you have at least one registration in your event, a sample Mobile App QR Code will be presented. Just scan this code with your phone camera to open the app. Testing allows you to catch and fix any issues before the app goes live, ensuring it meets attendee expectations.
By following these steps, you’ll have a functional, visually appealing mobile app that attendees can rely on during your event. With the app’s foundation set, you’re ready to start adding vendors and building an interactive floorplan in the next chapter.
Chapter 2: Adding Vendors and Creating Vendor Profiles
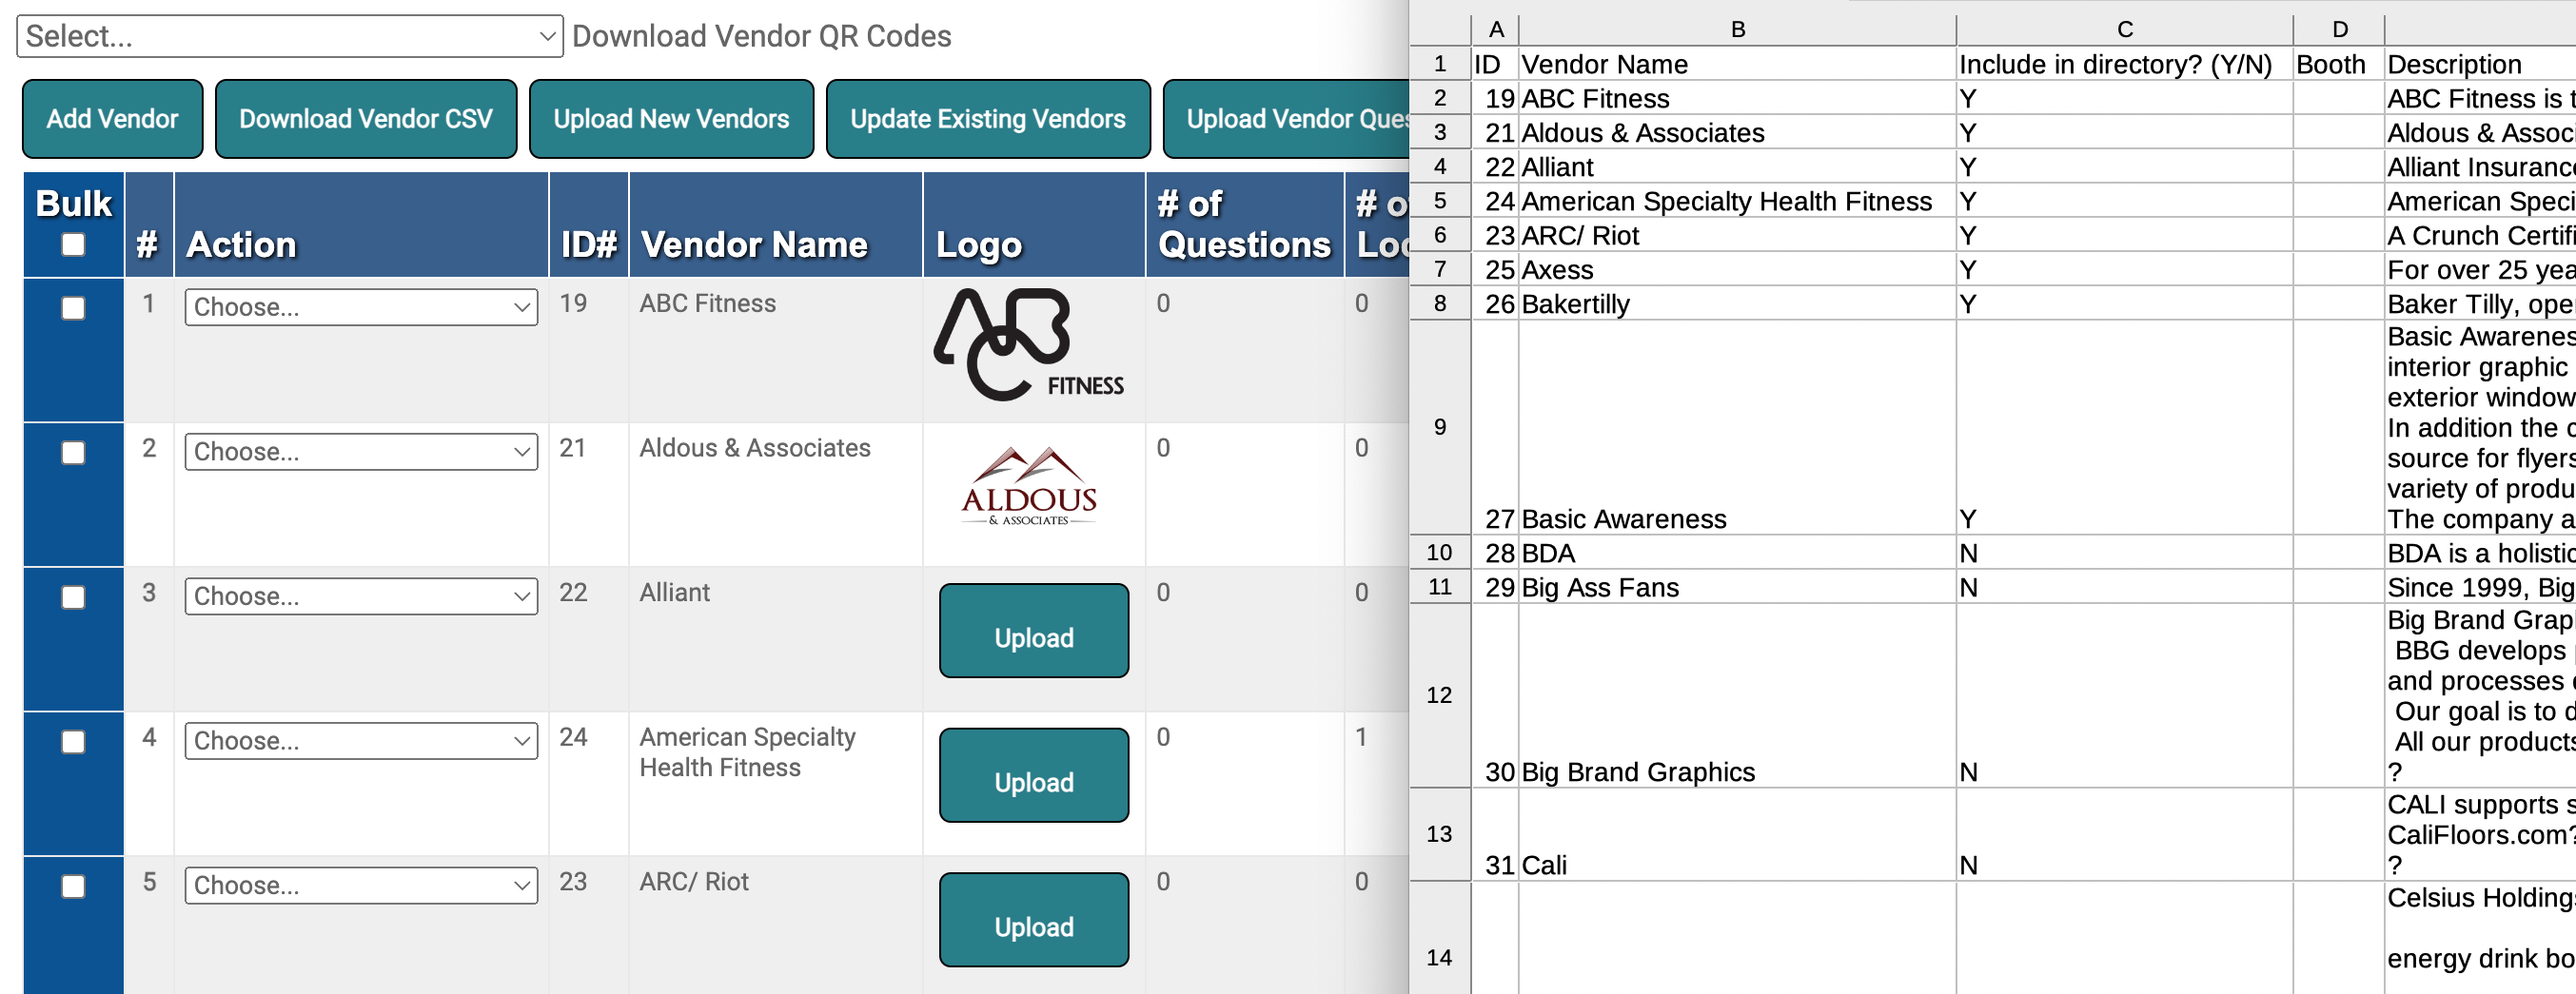
Vendors are a cornerstone of many events, and providing detailed vendor information helps attendees connect with exhibitors more effectively. With rsvpBOOK’s tools, you can organize vendor details, create interactive profiles, and highlight key participants like sponsors. This chapter will guide you through adding vendors to your mobile app and optimizing their visibility.
Step 1: Collecting Vendor Information
Before adding vendors to the app, gather the necessary details to ensure their profiles are complete and informative:
- Basic Information: Collect vendor names, booth numbers, and contact details.
- Descriptions: Request a short description of their offerings (products, services, or specialties).
- Media Assets: Obtain logos (e.g., 256×256 PNG or JPEG) if desired to show in the vendor profile.
- Special Directory Highlights: Add special color highlighting to denote green vendors or any other special designations you offer. This can be reflected in both the vendor directory list as well as on the vendor map.
- Special Map Highlights: On your vendor map, you can also include custom colored stars as an extra level of designation. This can be used for things like your vendor of the year.
Step 2: Adding Vendors to the App
Once you have the information, follow these steps to add vendors:
- Go to the “Vendors” section of your Mobile App Settings.
- Add Vendor Details:
- Enter the vendor’s name, booth number, and category.
- Upload their logo.
- Create Descriptions: Include a short description summarizing what attendees can expect at their booth.
- Assign Highlight Colors: Set any needed directory or map colors for the vendor.
Save the profile, ensuring it’s correctly linked to their assigned booth on the event floorplan.
If you have a large number of vendors, you can use Upload New Vendors to bulk import through a spreadsheet. A sample template is available when you first open the tool.
Adding vendors to your app enhances attendee engagement and streamlines exhibitor interactions. With vendor profiles in place, you’re ready to move on to creating an interactive floorplan, which we’ll cover in the next chapter.
Chapter 3: Creating Your Interactive Floorplan
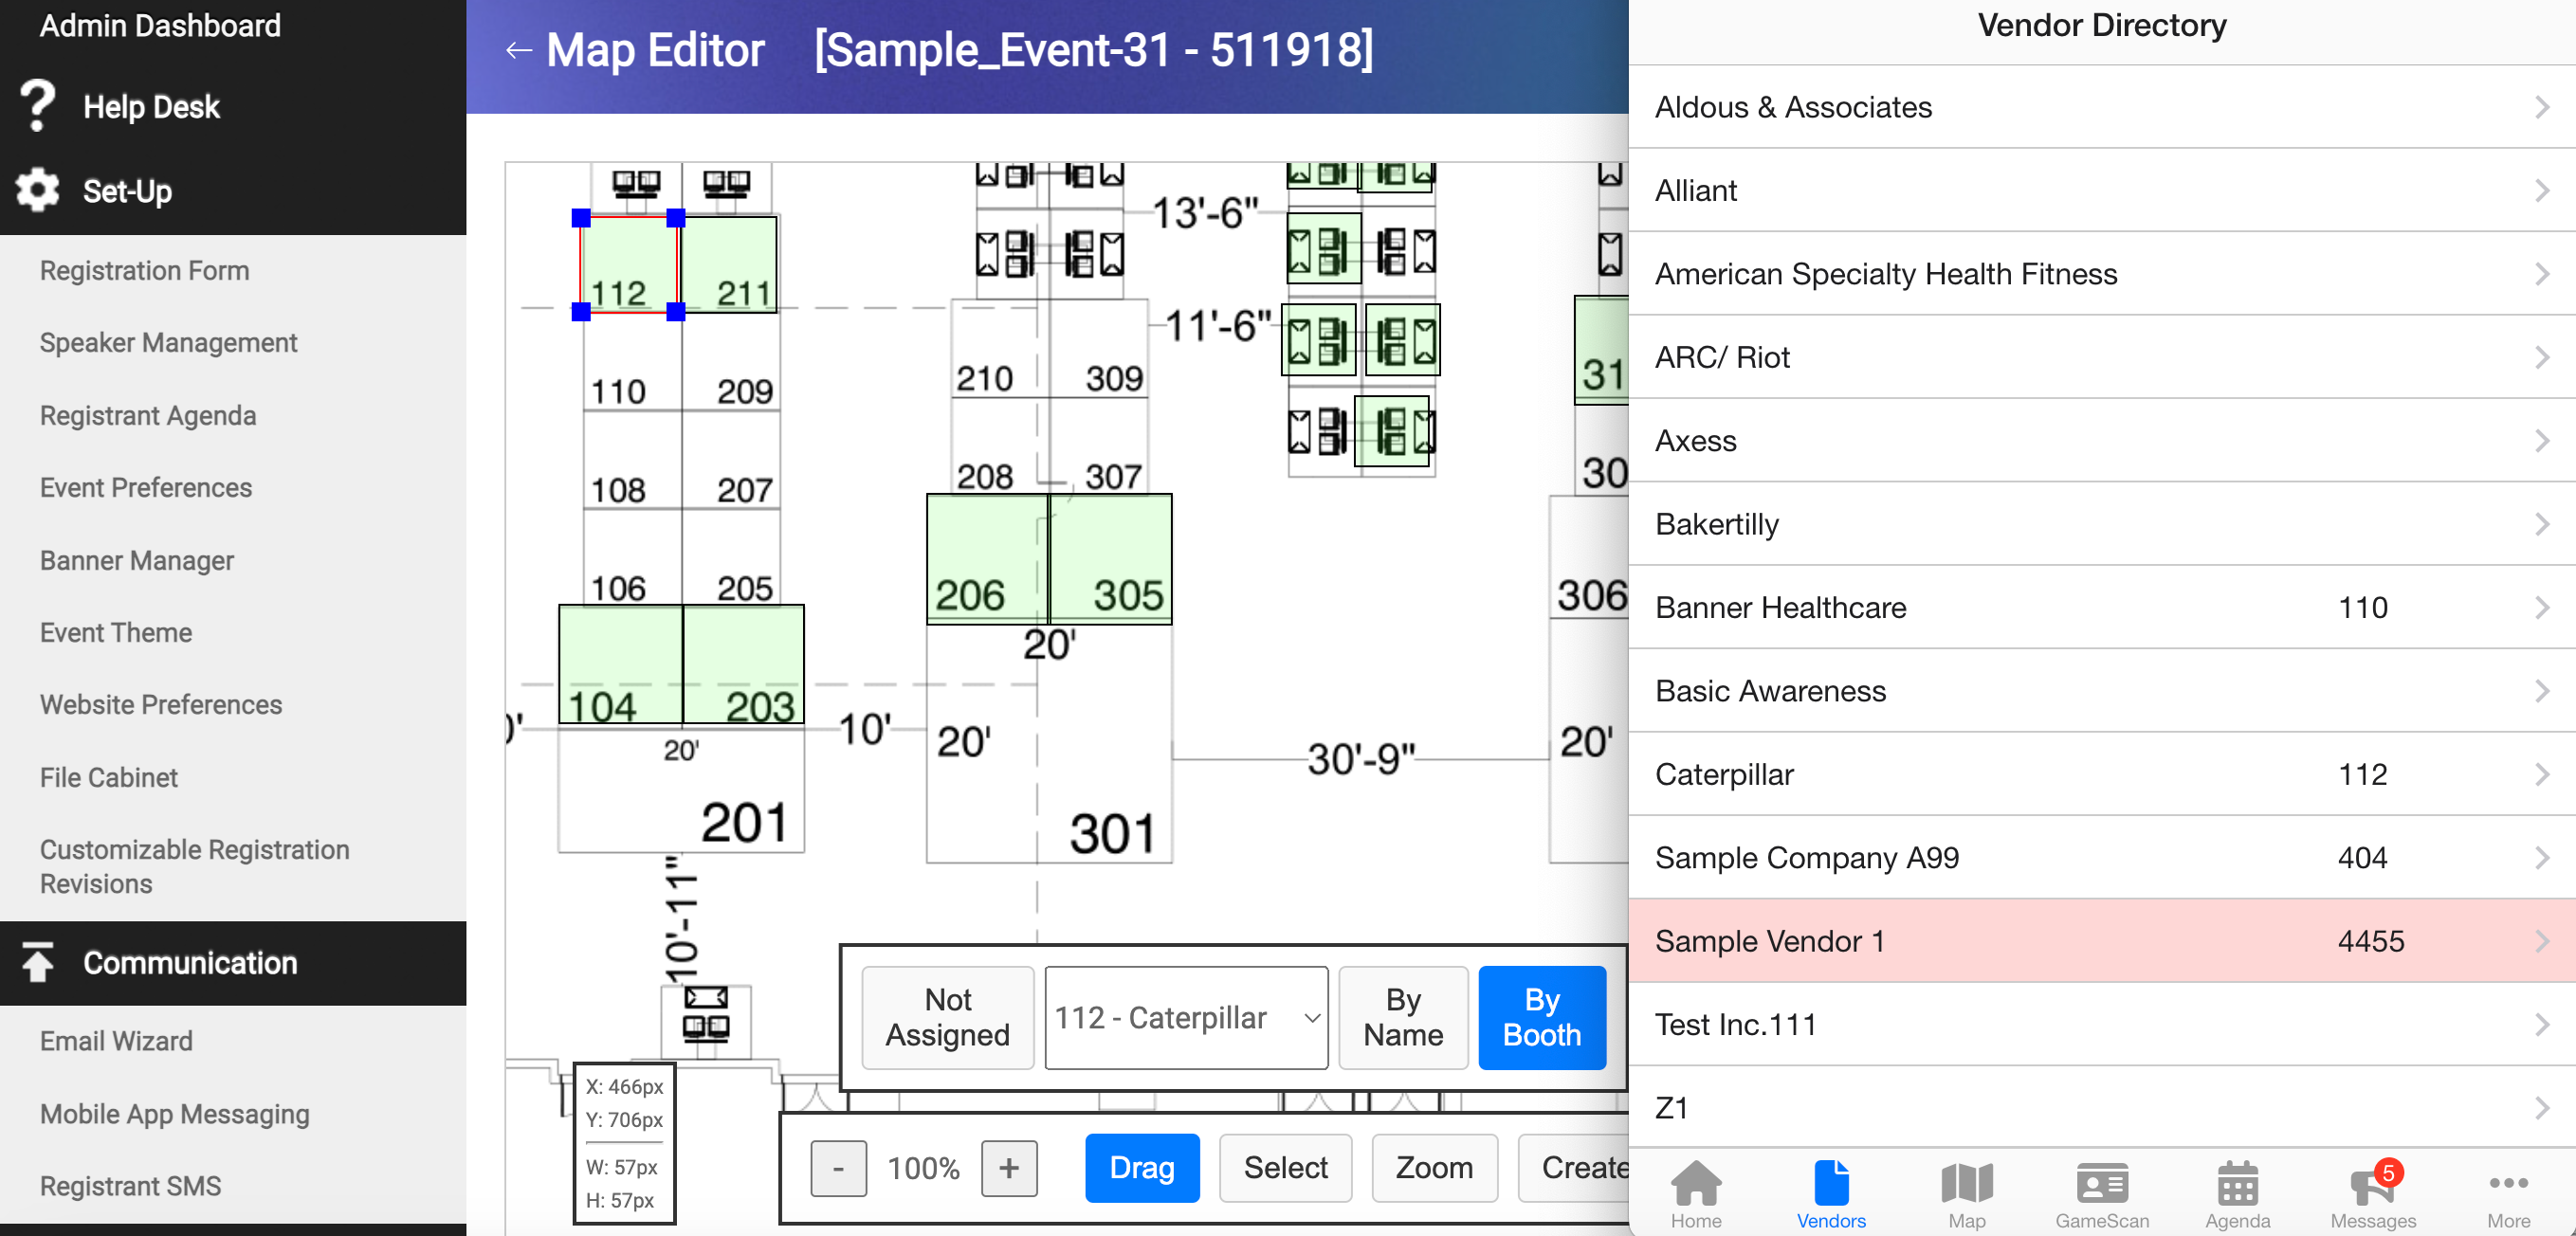
Interactive floorplans help attendees navigate your event space effortlessly, connect with vendors, and plan their experience. rsvpBOOK’s tools make it easy to set up a floorplan that links directly to vendor profiles and other event features. This chapter will guide you through uploading, designing, and enabling your floorplan.
Step 1: Preparing Your Floorplan
A polished floorplan ensures accuracy and ease of use for attendees. Follow these steps:
- Go to On-Site Tools → Registrant Mobile App → App Settings.
- Upload your floorplan as a high-resolution PNG.
- Use the final version of your floorplan, as changes later may require booths to be repositioned or resized.
- Set default booth colors to represent clickable booths on the map.
- Add a legend for custom booth colors and star icons used for special designations.
Step 2: Assigning Booths to Vendors
With your floorplan uploaded, assign vendors to their booths:
- Go to Registrant Mobile App → Map Editor.
- Use the drawing tools to trace each booth over your floorplan.
- Sort your vendor dropdown by booth number to streamline assignments.
- Use the filter to display only vendors that still need to be assigned.
- Select and assign vendors to booths from the dropdown.
- Duplicate booths as needed using Ctrl+C and Ctrl+V for quick setup.
- Repeat until all vendors are assigned to their respective booths.
Step 3: Enabling Floorplan Pages
Once your floorplan is complete, enable it in your app:
- Go to On-Site Tools → Registrant Mobile App → Vendor List/Map Pages.
- Enable the Vendor Map and Vendor List pages.
- Customize the labels and page text as needed.
- Position these pages in your app’s navigation using On-Site Tools → Customize Navigation.
- Many events place these pages on the app’s main navigation panel for easy access.
Step 4: Testing Your Floorplan
Before launching your floorplan, verify its functionality:
- Check Booth Assignments: Ensure all booths are linked to the correct vendors.
- Test Interactivity: Confirm that clicking on a booth opens the correct vendor profile.
- Simulate Navigation: Walk through the floorplan as an attendee to ensure it’s intuitive.
Testing ensures your floorplan is accurate and user-friendly, helping attendees navigate your event with ease.
With your interactive floorplan in place, attendees can quickly locate vendors, explore booth details, and plan their event experience. In the next chapter, we’ll explore gamification to further enhance engagement and interactivity.
Chapter 4: Enabling Gamification
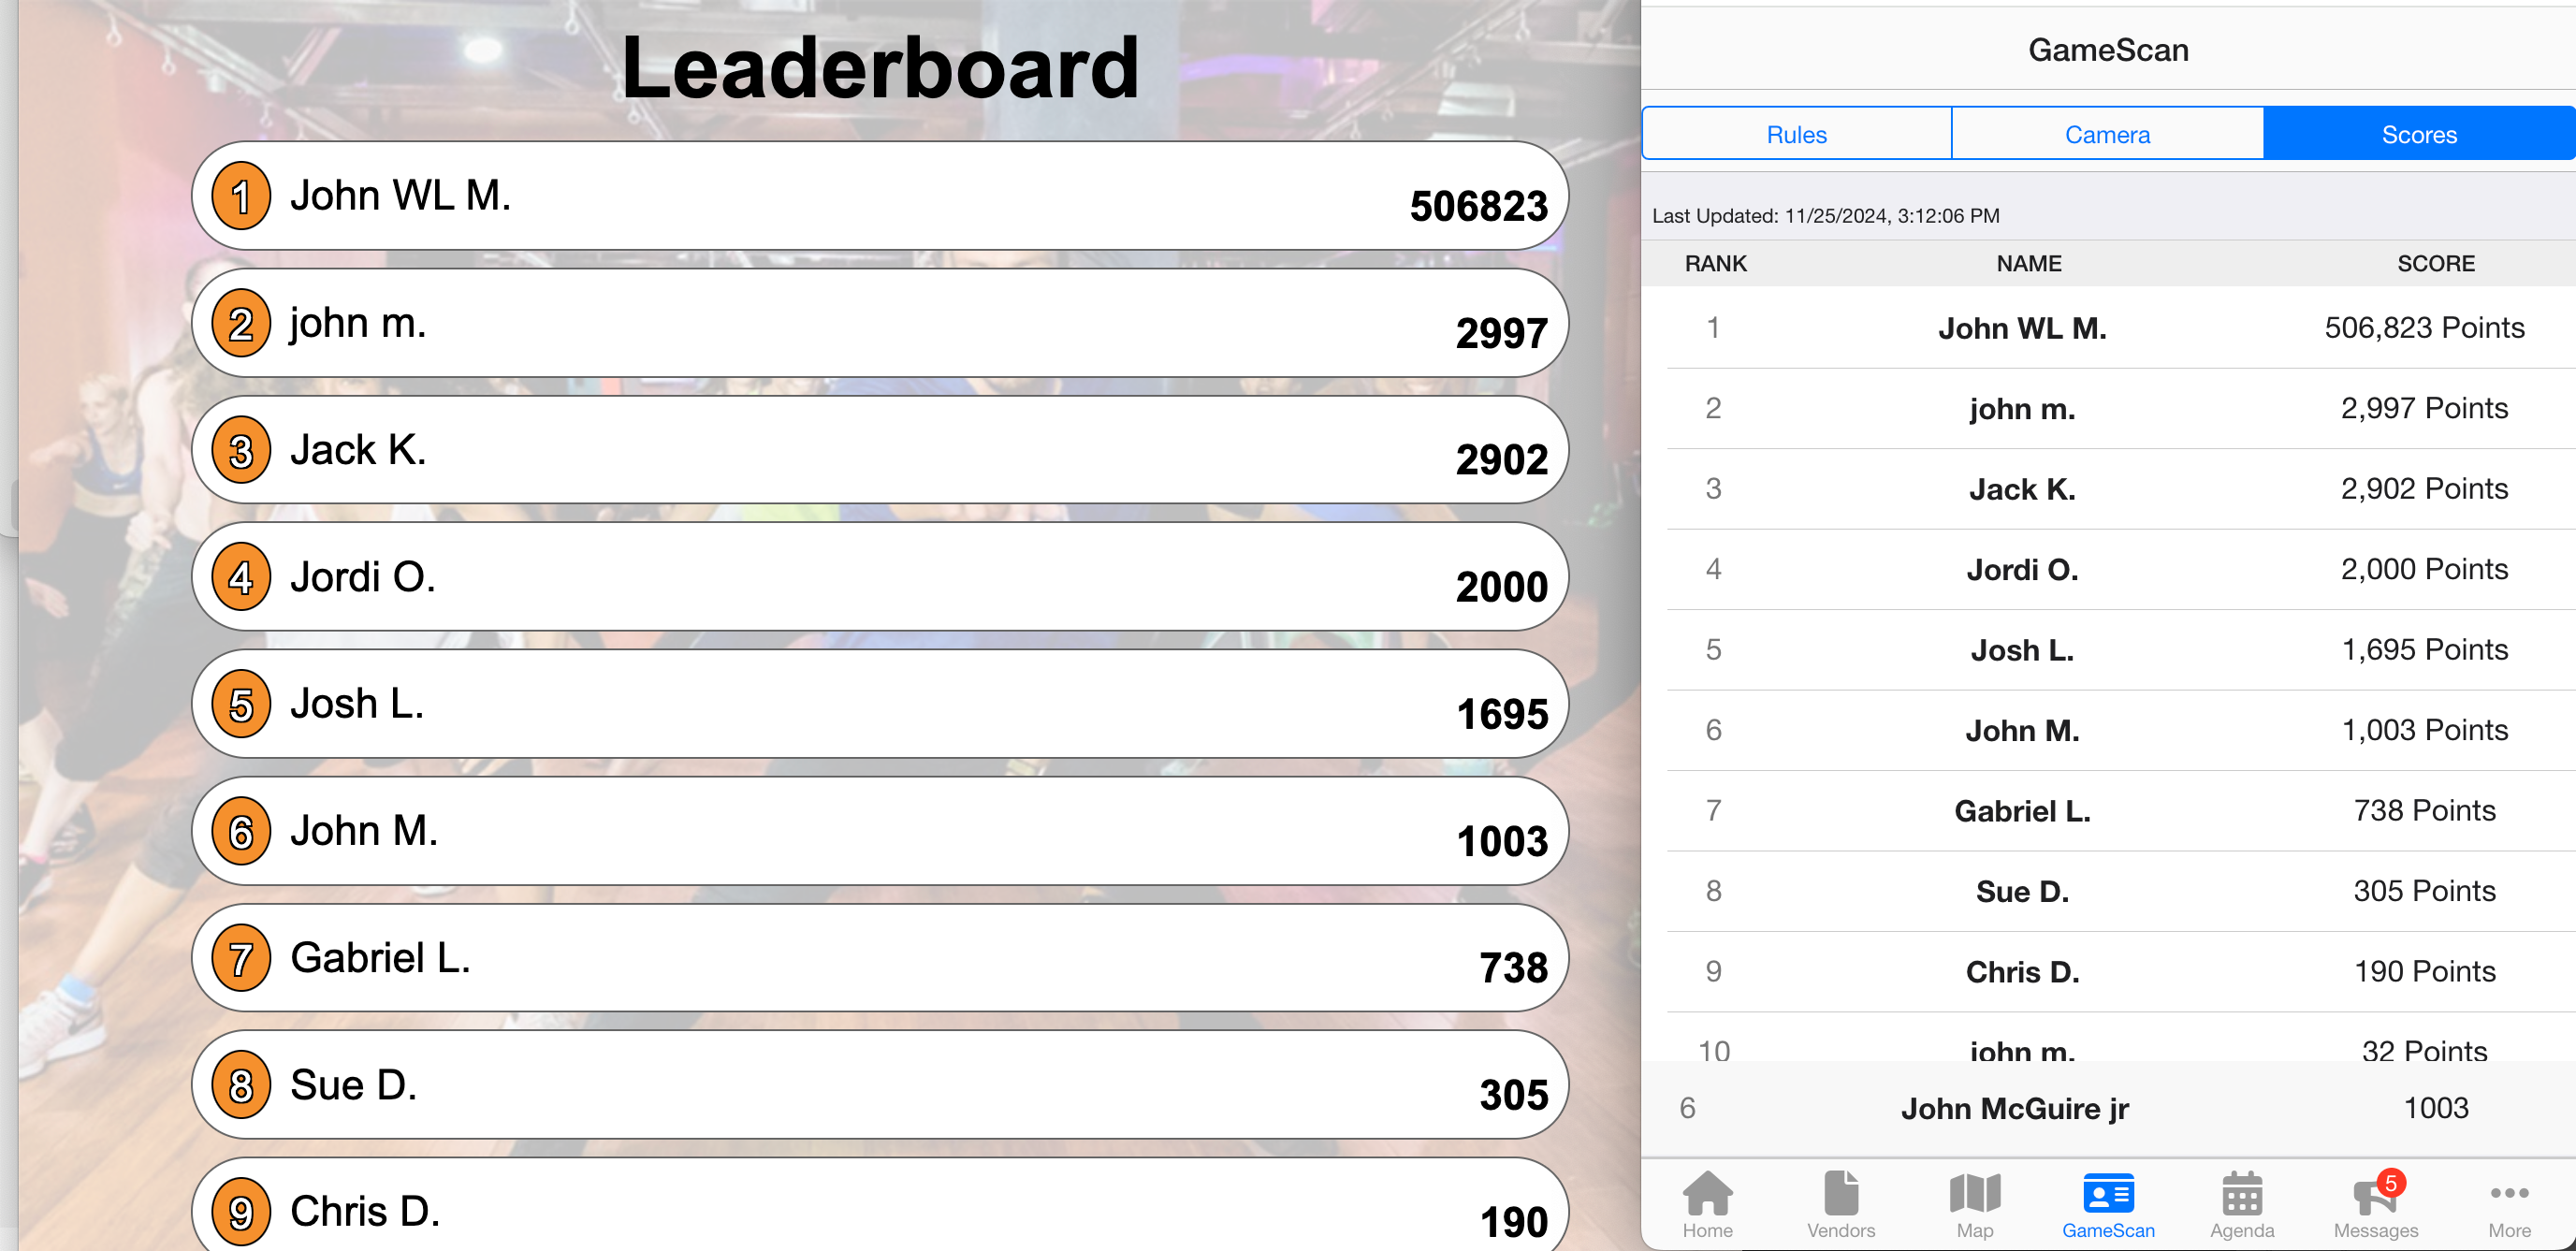
Gamification adds a layer of interactivity and engagement to your event by turning attendance and participation into a rewarding challenge. With rsvpBOOK, you can configure gamification settings, allow attendees to earn points for scanning QR codes, and even include trivia questions to test their knowledge. This chapter will guide you through enabling gamification, adding scan locations and codes, and testing the feature to ensure it’s working correctly.
Step 1: Turning On and Configuring Gamification
Start by enabling gamification and setting its basic parameters:
- Go to On-Site Tools → Registrant Mobile App → Gamification Settings.
- Enable gamification.
- Configure point-earning rules:
- Define the default points awarded for scanning vendor or location QR codes.
- Optionally, schedule specific timeframes when points can be earned. Scanning will be blocked outside these times
- Enable the Interactive Map feature to show attendees which vendors they’ve already scanned.
Configuring these settings ensures your gamification system aligns with your event goals and provides a dynamic attendee experience.
Step 2: Adding Independent Scan Locations
Independent scan locations allow attendees to earn points outside of specific vendor booths. These can represent areas like regions of the show floor, general conference halls, or special event areas.
- Go to On-Site Tools → Registrant Mobile App → Gamification Settings.
- Add a new scan location:
- Enter the location name (e.g., “North Hall Entrance,” “Networking Lounge”).
- Assign the point value for scanning this location.
- Print QR codes for these locations:
- Download location QR codes as PDFs or individual images.
- Print and distribute these QR codes at key event areas for attendee access.
- Optionally attach a trivia question to the scan location:
- Add a multiple-choice or true/false question that attendees must answer correctly to earn points.
Using independent scan locations enhances gamification by encouraging attendees to explore all areas of your event. If you have a large number of locations, you can use Upload New Stations to bulk import through a spreadsheet. A sample template is available when you first open the tool.
Step 3: Updating Vendor Scan Points
Each vendor can have a unique QR code that attendees can scan to earn points. Follow these steps to update vendor scan settings:
- Go to On-Site Tools → Registrant Mobile App → Vendors.
- Assign a point value for each vendor scan:
- Vendors can have uniform points or varying values depending on importance or sponsorship level.
- Download vendor QR codes:
- Export QR codes as a consolidated PDF or individual images for each vendor.
- Distribute codes to vendors for placement at their booths.
- Optionally attach a trivia question to vendor scan codes:
- Trivia questions can add an educational or fun element to the scanning process.
Vendor scan points incentivize booth visits and help vendors maximize their engagement with attendees.
Step 4: Testing Gamification
Before enabling gamification for attendees, test the system to ensure everything is functioning correctly:
- Create a test registration for your event from your Admin Dashboard.
- View the test registrant’s Mobile App QR Code in the Registrant List.
- Use your phone camera to scan this QR code to access the app as the test registrant.
- Test scanning QR codes:
- Visit both vendor and independent location QR codes.
- Verify that points are awarded correctly and appear in the attendee’s live point totals.
- Test trivia questions by scanning a code with an attached question and answering it.
Testing gamification ensures a smooth attendee experience and highlights any configuration adjustments needed before launch.
By enabling gamification, you add an engaging, interactive element to your event that encourages attendees to explore more, visit vendors, and participate actively. With the system tested and ready, your event app is now fully equipped to deliver a dynamic and rewarding experience to attendees. In the next chapter, we’ll review best practices for monitoring attendee engagement and analyzing gamification success.
Chapter 5: Exploring Extra Options for Attendee Convenience
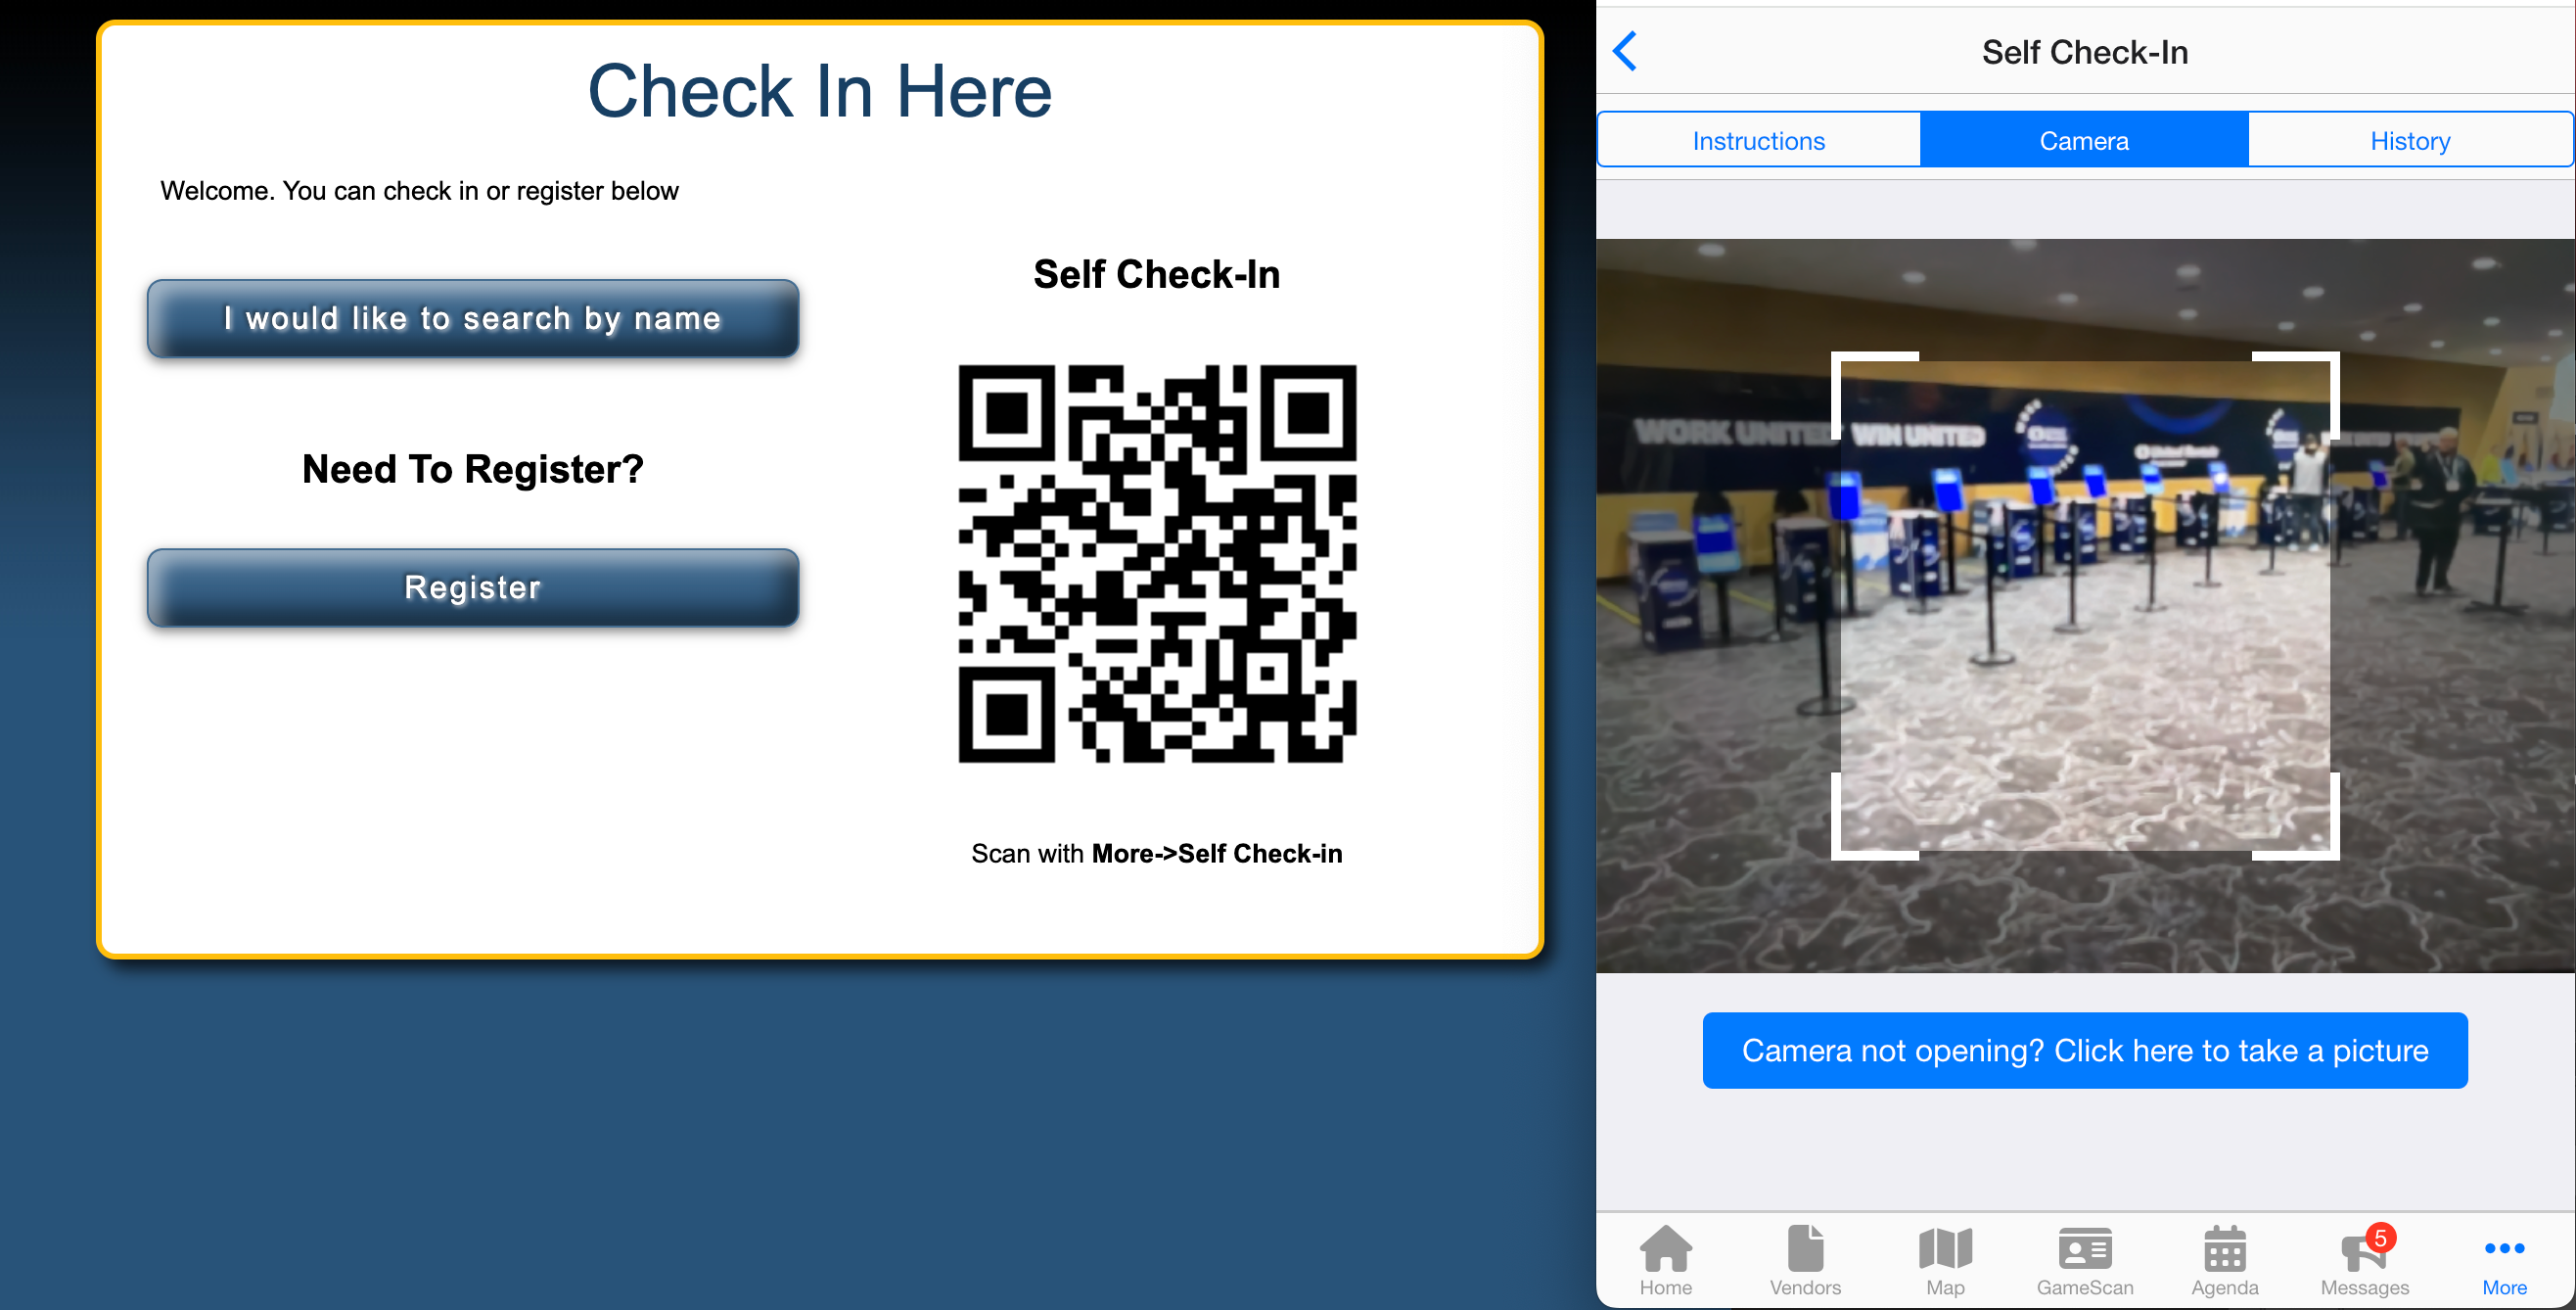
While your event’s mobile app already provides robust tools for navigation, engagement, and interaction, rsvpBOOK offers additional features that can streamline and enhance the attendee experience. These optional tools can reduce friction at check-in points and empower attendees to take greater control of their participation.
Self Check-In with Kiosk+ Integration
The Self Check-In feature, found in the Registrant Mobile App → Self Check-In section, allows registrants to bypass traditional check-in processes and speed up their entry into the event.
How It Works:
- Opening Screen QR Code:
An optional QR code can be displayed on the Kiosk+ opening screen, allowing registrants to scan it directly from their mobile app.- This automatically identifies the attendee and drops them into the check-in workflow without needing to search manually or enter details.
- It is especially useful for high-traffic events where speeding up the check-in process is critical.
- Kiosk+ is available from your Member Dashboard → Manage Events
- Individual Session Check-Ins:
Event organizers can also offer QR codes for specific sessions, enabling attendees to check themselves in as they enter.- For example, a workshop could have a QR code at the entrance, allowing attendees to scan and confirm their participation.
- Instructors can also show the code near the end of the workshop in their slide deck.
- This ensures accurate tracking of attendance and minimizes the need for manual intervention.
Benefits:
- Saves time for attendees and organizers.
- Reduces wait times at check-in points.
- Ensures accurate and automated attendance tracking.
By enabling Self Check-In, you provide attendees with a seamless entry experience, reinforcing the overall efficiency and professionalism of your event.
Closing: Bringing It All Together
Creating a compelling and interactive event app with rsvpBOOK is not just about offering digital tools—it’s about crafting an experience that aligns with your event’s goals and enhances the journey for every attendee. From customizing the app’s appearance and adding essential features to leveraging interactive maps and gamification, the possibilities are vast and impactful.
As you implement the steps outlined in this guide, remember these key takeaways:
- Start with Your Audience in Mind: Understand what your attendees, vendors, and stakeholders need to ensure your app serves as a valuable resource.
- Iterate and Test: Thorough testing is crucial for delivering a smooth experience. Use feedback from your team and a small group of test attendees to refine the app before launch.
- Focus on Engagement: Tools like gamification, personalized schedules, and interactive maps are not just features—they are opportunities to connect attendees more deeply with your event.
By taking full advantage of rsvpBOOK’s mobile app tools, you can transform your event into a modern, engaging experience that attendees will remember long after it concludes. Whether it’s navigating the show floor, connecting with vendors, or earning rewards through gamification, your app is the gateway to a seamless and interactive event.
With this guide as your foundation, you’re well-equipped to build an app that not only meets but exceeds attendee expectations. Here’s to your event’s success!
Resources
Vendor Details Upload Template: Simplify Data Collection and Management
To streamline the process of collecting and uploading vendor details for your event, we’ve provided a sample spreadsheet template. This resource allows you to efficiently gather all necessary vendor information in one place and upload it directly into your event management system.
By leveraging this tool, you can simplify vendor management and ensure their profiles are accurately represented in your app.
https://s3.us-east-1.amazonaws.com/rsvpbook.public/Resources/Sample_Vendor_List.csv
Comprehensive App Testing Checklist: Ensuring a Seamless Event Experience
Testing your event app is a critical step to ensure a smooth and engaging experience for attendees, vendors, and organizers alike. This comprehensive checklist covers all aspects of app functionality, from navigation and core features to advanced tools like interactive floorplans, gamification, and self check-in.
By following these steps, you can identify and resolve potential issues before launch, ensuring your app delivers on its promise of a seamless, interactive event experience.
https://s3.us-east-1.amazonaws.com/rsvpbook.public/Resources/Mobile_App_Testing_Checklist.docx

